Ready IIS at Windows 7–with only 2 steps

Installing IIS 7 on Windows Vista and Windows 7 This must be familiar to most of the developer and deployment guys. And I admit that, this is still my favorite way to install IIS.

But today, in order to simplify the deployment process. I keep digging and found a useful way to do what we need.

%windir%\system32\dism.exe /online /quiet /enable-feature /featurename:IIS-WebServerRole
%windir%\system32\dism.exe /online /quiet /enable-feature /featurename:IIS-WebServer
%windir%\system32\dism.exe /online /quiet /enable-feature /featurename:IIS-CommonHttpFeatures
%windir%\system32\dism.exe /online /quiet /enable-feature /featurename:IIS-HttpErrors
%windir%\system32\dism.exe /online /quiet /enable-feature /featurename:IIS-HttpRedirect
%windir%\system32\dism.exe /online /quiet /enable-feature /featurename:IIS-ApplicationDevelopment
%windir%\system32\dism.exe /online /quiet /enable-feature /featurename:IIS-NetFxExtensibility
%windir%\system32\dism.exe /online /quiet /enable-feature /featurename:IIS-HealthAndDiagnostics
%windir%\system32\dism.exe /online /quiet /enable-feature /featurename:IIS-HttpLogging
%windir%\system32\dism.exe /online /quiet /enable-feature /featurename:IIS-LoggingLibraries
%windir%\system32\dism.exe /online /quiet /enable-feature /featurename:IIS-RequestMonitor
%windir%\system32\dism.exe /online /quiet /enable-feature /featurename:IIS-HttpTracing
%windir%\system32\dism.exe /online /quiet /enable-feature /featurename:IIS-Security
%windir%\system32\dism.exe /online /quiet /enable-feature /featurename:IIS-URLAuthorization
%windir%\system32\dism.exe /online /quiet /enable-feature /featurename:IIS-RequestFiltering
%windir%\system32\dism.exe /online /quiet /enable-feature /featurename:IIS-IPSecurity
%windir%\system32\dism.exe /online /quiet /enable-feature /featurename:IIS-Performance
%windir%\system32\dism.exe /online /quiet /enable-feature /featurename:IIS-HttpCompressionDynamic
%windir%\system32\dism.exe /online /quiet /enable-feature /featurename:IIS-WebServerManagementTools
%windir%\system32\dism.exe /online /quiet /enable-feature /featurename:IIS-ManagementScriptingTools
%windir%\system32\dism.exe /online /quiet /enable-feature /featurename:IIS-IIS6ManagementCompatibility
%windir%\system32\dism.exe /online /quiet /enable-feature /featurename:IIS-Metabase
%windir%\system32\dism.exe /online /quiet /enable-feature /featurename:IIS-HostableWebCore
%windir%\system32\dism.exe /online /quiet /enable-feature /featurename:IIS-StaticContent
%windir%\system32\dism.exe /online /quiet /enable-feature /featurename:IIS-DefaultDocument
%windir%\system32\dism.exe /online /quiet /enable-feature /featurename:IIS-DirectoryBrowsing
%windir%\system32\dism.exe /online /quiet /enable-feature /featurename:IIS-WebDAV
%windir%\system32\dism.exe /online /quiet /enable-feature /featurename:IIS-ISAPIExtensions
%windir%\system32\dism.exe /online /quiet /enable-feature /featurename:IIS-ISAPIFilter
%windir%\system32\dism.exe /online /quiet /enable-feature /featurename:IIS-ASPNET
%windir%\system32\dism.exe /online /quiet /enable-feature /featurename:IIS-ASP
%windir%\system32\dism.exe /online /quiet /enable-feature /featurename:IIS-CGI
%windir%\system32\dism.exe /online /quiet /enable-feature /featurename:IIS-ServerSideIncludes
%windir%\system32\dism.exe /online /quiet /enable-feature /featurename:IIS-CustomLogging
%windir%\system32\dism.exe /online /quiet /enable-feature /featurename:IIS-BasicAuthentication
%windir%\system32\dism.exe /online /quiet /enable-feature /featurename:IIS-HttpCompressionStatic
%windir%\system32\dism.exe /online /quiet /enable-feature /featurename:IIS-ManagementConsole
%windir%\system32\dism.exe /online /quiet /enable-feature /featurename:IIS-ManagementService
%windir%\system32\dism.exe /online /quiet /enable-feature /featurename:IIS-WMICompatibility
%windir%\system32\dism.exe /online /quiet /enable-feature /featurename:IIS-LegacyScripts
%windir%\system32\dism.exe /online /quiet /enable-feature /featurename:IIS-LegacySnapIn
%windir%\system32\dism.exe /online /quiet /enable-feature /featurename:IIS-FTPServer
%windir%\system32\dism.exe /online /quiet /enable-feature /featurename:IIS-FTPSvc
%windir%\system32\dism.exe /online /quiet /enable-feature /featurename:IIS-FTPExtensibility
%windir%\system32\dism.exe /online /quiet /enable-feature /featurename:IIS-WindowsAuthentication
%windir%\system32\dism.exe /online /quiet /enable-feature /featurename:IIS-DigestAuthentication
%windir%\system32\dism.exe /online /quiet /enable-feature /featurename:IIS-ClientCertificateMappingAuthentication
%windir%\system32\dism.exe /online /quiet /enable-feature /featurename:IIS-IISCertificateMappingAuthentication
%windir%\system32\dism.exe /online /quiet /enable-feature /featurename:IIS-ODBCLogging
%windir%\system32\dism.exe /online /quiet /enable-feature /featurename:NetFx3
%windir%\system32\dism.exe /online /quiet /enable-feature /featurename:WAS-WindowsActivationService
%windir%\system32\dism.exe /online /quiet /enable-feature /featurename:WAS-ProcessModel
%windir%\system32\dism.exe /online /quiet /enable-feature /featurename:WAS-NetFxEnvironment
%windir%\system32\dism.exe /online /quiet /enable-feature /featurename:WAS-ConfigurationAPI
%windir%\system32\dism.exe /online /quiet /enable-feature /featurename:WCF-HTTP-Activation
%windir%\system32\dism.exe /online /quiet /enable-feature /featurename:WCF-NonHTTP-Activation

This bunch of scripts doing the job now. Those features name are quite understandable. Simply save this to a batch (.bat) file and now the steps become

  1. Right click on the Install_IIS.bat.
  2. Select “Run as administrator”.

Ok, now it reduced few pages of our installation guide. In-fact, we make it even more “environment friendly” by keep scripting.

%windir%\system32\inetsrv\appcmd add apppool /name:"ASP.NET 2.0 Pool" /managedRuntimeVersion:v2.0 /managedPipelineMode:Integrated
%windir%\system32\inetsrv\appcmd add apppool /name:"ASP.NET 4.0 Pool" /managedRuntimeVersion:v4.0 /managedPipelineMode:Integrated

These scripts replace the steps needed to create the Application Pools.

netsh http add sslcert ipport=0.0.0.0:443 certstorename=MY certhash=1C14B3461348AD3CB270BEA7316963AEC5C2B6B4 appid={5a599f4f-02dc-4120-8646-74fcbc5b4827}

%windir%\system32\inetsrv\appcmd set config -section:system.applicationHost/sites /+"[name='Default Web Site'].bindings.[protocol='https',bindingInformation='*:443:']" /commit:apphost

These scripts prepare us the HTTPS binding with the predefined cert.

Awesome! Computer is doing the job and we are looking for more scripting now. Open-mouthed smile

Include Javascript files safely

Sometimes, you might accidently exclude javascript files because you were to use the method below to include javascript files.

<script language="javascript" src="Scripts/jquery-1.4.1.min.js" type="text/javascript" ></script>

Actually this method works most of the time. But if your project goes complicated and more modules are required to develop and you started to use Folder to group your pages. Here I use 3 child folders for the simulation.

image

Let check what will happen to the javascript file that I wish to include in NewPage.aspx.

image

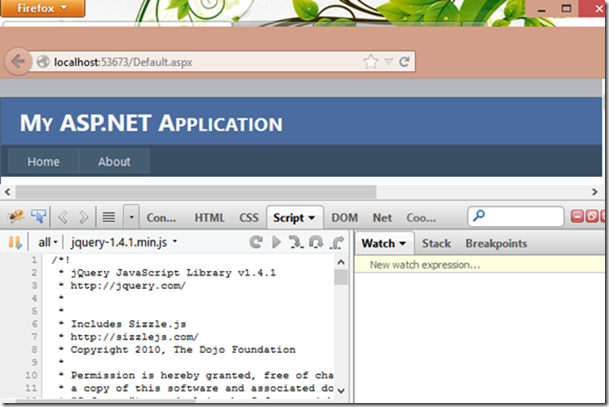
When I inspect the javascript files by using FireBug, I cannot see it from the Script listing.

image

But it is available in Default.aspx.

To overcome this, I prefer to use code behind to include javascript files. Below is the code that I placed in the master page for this purpose.

        protected void Page_PreRender(object sender, EventArgs e)
        {
            System.Web.UI.HtmlControls.HtmlGenericControl script;

            script = new System.Web.UI.HtmlControls.HtmlGenericControl("script");
            script.Attributes["type"] = "text/javascript";
            script.Attributes["src"] = Page.ResolveUrl("~/Scripts/jquery-1.4.1.min.js?v=1");
            Page.Header.Controls.Add(script);
        }

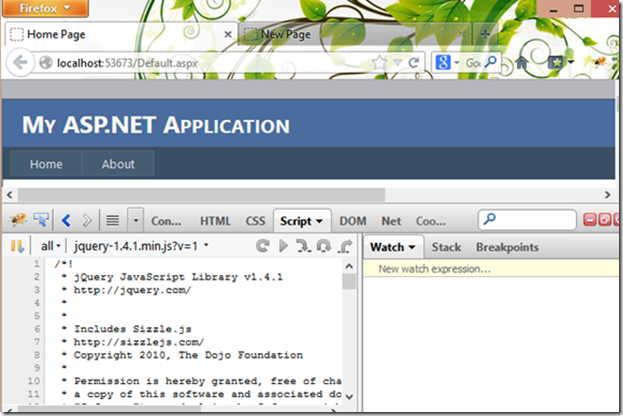
As you expected, now both pages can have javascript file included.

image

image

script.Attributes["src"] = Page.ResolveUrl("~/Scripts/jquery-1.4.1.min.js?v=1");

You might curious why I included a query string at the end of the javascript file name. This is because during the development, javascript files change frequently. And my preferred browser – Firefox comes with a feature which will cache the javascript files. Most probably this is to has a better performance but it make the new version of my javascript cannot be render out. So this workaround allow me to trick the browser to always get the file from server whenever I change the “version” (v=1) number.

Hope this sharing make your javascript files render out safely.

Download Attachment

ASP.NET Callback – and HOW?

If you try to find ASP.NET Callback sample from your favourite search engine, most probably you will get samples with this method.

ClientScriptManager.GetCallbackEventReference

It is correct that you have to use this method to register the javascript function to handle Callback. With this approach, I found it is not easy to manage if I want to perform Callback in multiple Web User Controls at the same page. And also, personally, I don’t like to write javascript functions in code behind files. Unless I have to. I consider this as Separation of concerns. Open-mouthed smile

By following Implementing Client Callbacks Programmatically Without Postbacks in ASP.NET Web Pages article, I found eventually the Callback method registration will end up with this javascript rendered at client side.

<script type="text/javascript">
//<![CDATA[
function CallServer(arg, context) {WebForm_DoCallback('__Page',arg,ReceiveServerData,"",null,false); }//]]>
</script>

Since thing become clear to me, so I plan to write everything in javascript file. I quickly check what is WebForm_DoCallback and what are the arguments that it demand.

function WebForm_DoCallback(eventTarget, eventArgument, eventCallback, context, errorCallback, useAsync)

All of the arguments are pretty meaningful from the name itself. By comparing these two scripts, I found the only challenge is to figure out what is __Page? After searching & several testing, I can confirm it is UniqueID of the page/web user control. So it end up with this code in my page.

        protected void Page_Init(object sender, EventArgs e)
        {
            String script;

            if (!Page.IsCallback)
            {
                Page.ClientScript.GetCallbackEventReference(this, "", "", "");

                if (!Page.ClientScript.IsClientScriptIncludeRegistered("JQuery"))
                {
                    Page.ClientScript.RegisterClientScriptInclude("JQuery", Page.ResolveUrl("~/Scripts/jquery-1.9.0.js"));
                }

                if (!Page.ClientScript.IsClientScriptIncludeRegistered("Default"))
                {
                    Page.ClientScript.RegisterClientScriptInclude("Default", Page.ResolveUrl("~/Default.js"));
                }

                script = "var _Default = new Default('" + this.ClientID + "','" + UniqueID + "',['_Default','']);";

                //Create the clientscript instance here.
                if (!Page.ClientScript.IsStartupScriptRegistered("_Default_Script"))
                {
                    Page.ClientScript.RegisterStartupScript(this.GetType(), "_Default_Script", script, true);
                }
            }
        }

Why Page_Init event handle, not Page_Load or Page_PreRender. This is because Page_Init raised after all controls have been initialized … For detail, you can refer to ASP.NET Page Life Cycle Overview. When implement with web user controls, sometimes, I need methods in web user controls to be ready for consume when Page ready but never in the other way around.

I still need to include Page.ClientScript.GetCallbackEventReference method. Otherwise, the required resources(javascript) will not include to the page.

script = "var _Default = new Default('" + this.ClientID + "','" + UniqueID + "',['_Default','']);";

Default in this script is my javascript class for this page. It need 3 arguments during initialize. They are:

  • this.ClientID : this argument doesn’t make sense for this page because it doesn’t implement Master Page and not Web User Control. I have another page(Default.aspx in MasterPage folder) in the attached source code which need this argument value to register the event handler for each controls at client side.
  • UniqueID : as I mentioned, I need this argument value for WebForm_DoCallback method.
  • ‘_Default’ : my practice but not using in this sample. You can ignore it.

//cid = ClientID
//uid = UniqueID
//arg =  ClientInstanceName, "".
function Default(cid, uid, arg) {
    var that = this;

    this._uID = uid;
    this._cID = cid;
    this._clientInstanceName = arg[0];

    Default.prototype.GetData = function () {
        var data = new Array();

        data[0] = $("#FirstName")[0].value.toString();
        data[1] = $("#LastName")[0].value.toString();

        return data;
    };

    Default.prototype.UpdateData = function () {
        var arg = new String();

        arg = "UPDATE|" + this.GetData().join("|");

        WebForm_DoCallback(this._uID, arg, this.CallbackResult, null, null, true);
    };

    Default.prototype.CallbackResult = function (arg, context) {
        var data = arg.split("|");

        switch (data[0]) {
            case "UPDATE":
                alert("Callback done!");
                break;

            case "ERROR":
                alert(data[1]);
                break;
        }
    };

    Default.prototype.AddHandler = function () {
        var that = this;

        $("#SubmitButton_Callback").bind("click", function (s, e) {
            that.UpdateData();
        });
    };

    that.AddHandler();
}

Let’s have a look at Default.js file. If you going to ask about this and that, please spend some time on my previous blog post, This and That, and Javascript. Smile

Basically, I register an event handler for submit button click event. So it will execute UpdateData method, to get data and then execute Callback(WebForm_DoCallback) method. After the request travel to server and return, it will go the CallbackResult method. This has been registered at the WebForm_DoCallback method.

image

Now look at code behind, when I set a break point in RaiseCallbackEvent handler. I can see what had been passed from Callback method. With this, I can easily code and process these data and update to database. After this handler, the process will goes to GetCallbackResult handler. At this method, I code to check whether need to return result or error message. So that, at client side, I can handle it at CallbackResult method.

So, as you can see. To use Callback at ASP.NET, you have to code more. But it worth to do it if you wish to have a better server performance and a more responsive web site. It also make you have more understanding on ASP.NET.

Download Attachment

ASP.NET Callback – and WHY?

If you are familiar with ASP.NET Web Form development, I think Postback and Callback are not new topics for you. Now, let me show the impact on traffic for each methods.

image

I prepared 3 ways to perform server request for this sample. Each of them represented by a button and they are “Postback”, “Callback” and “Update Panel” (Partial Postback).

For a better illustration, I use Fiddler to capture the traffic. And let see what we have after click on each button.

  • Postback

image

For all the resources including javascript, embedded resources and web page (It can be more which including CSS files, images, media, external link… etc.) will be send to browser again even only one button begin clicked.

  • Callback

image

Not bad. Only web page being updated. With 1,192 bytes sent and 761 bytes received.

  • Update Panel

image

This one also not bad. Only web page being updated. With 1,319 bytes sent and 1,266 bytes received (As I only wrap one set of First Name, Last Name & Button controls in the Update Panel).

After this experiment, let me explain why the traffic is different for each different ways to reach server.

  • Postback

All contains of the web page (ViewState, Hidden Controls…etc.) will be send back to the server. During the browser process response of the request, it will request all resources again. Like Javascript files, Images, CSS files… .etc.

  • Callback

All contains of the web page (ViewState, Hidden Controls…etc.) will be send back to the server. Here I have to highlight one thing, ViewState objects do travel back to server but you are not able to modify any value of controls. This is because the page life cycle for Callback doesn’t include SaveViewState and Render events. For detail, you can refer to Brij Bhushan Mishra’s blog – Exploring Client Callback

  • Update Panel

All contains of the web page (ViewState, Hidden Controls…etc.) will be send back to the server. But what had been return in the response package is only content of the area that I put into the Update Panel Content Template. The page life cycle for this request is the same as Postback but just it will not refresh/update for the controls out of the Update Panel.

Summary

Postback: is the easiest way to program by using ASP.NET Web Form but It will make the traffic from server becomes heavy.

Callback: not easy to implement if compare among the other two. But it produce light traffic from server and return only what the request need.

Update Panel: not hard to implement but I suggest you to read Dave Ward’s blog – Why ASP.NET AJAX UpdatePanels are dangerous and have more understand on how it works before you consider to implement this.

A simple in-page pop up panel.

I prepared 2 sample pages to show on how to design your own pop up panel by using CSS, Javascript and Code Behind.

First, let see how a pop up panel look like at html.

popupBG

  • A div element cover the whole page with semi transparent or solid colour background.

popup

  • Another div element as the container of pop up panel at the centre of page.

By understand this, you can easily design your own pop up panel.

        <div id="SemiTransparentBG" class="fadePanel semiTransparent">
        </div>
        <div id="TransparentBG" class="fadePanel transparent">
        </div>
        <div id="PopUp" class="Popup">
            <div class="InnerPopup">
                <p>Here is the body of a pop up element.</p>
                <p id="PopUpBody"></p>
                <p>
                    <input type="button" id="Close" value="Close" onclick="ClosePopUp();" />
                </p>
            </div>
        </div>

Here, I prepared 3 div elements with different CSS classes. So that I can easily form 3 type of pop up panel by using the combination of them. Which are :

  • Modal PopUp with Semi Transparent Background
  • Modal PopUp with Transparent Background
  • PopUp without Background

CSS play a very important role to create the pop up effect at web page. Let me describe some of the important CSS classes that you can find in this sample.

.fadePanel
{
    position: fixed;
    width: 100%;
    height: 100%;
    top: 0px;
    left: 0px;
    z-index: 9999;
}

To form a full screen background, you have to use 100% for width and height, set 0px to top and left. Position = fixed so that it will not move event the page come with scroll bar. z-index = 9999 so that it will appeared on top of the others.

.Popup
{
    position: fixed;
    margin:0px 25%;
    z-index: 99999;
}

This CSS class applied to the outer of the pop up container. Position = fixed so that it will not move event the page come with scroll bar. Higher z-index so that it will appeared on top of the background panel. margin of left and right are actually adjustable according to the width of the pop up container. For this page, I’m using 25%.

.InnerPopup
{
    margin: auto;
    min-width: 380px;
    min-height: 200px;
    background-color: #CEC9C9;
    padding: 30px;
    -moz-border-radius-topright: 50px;
    border-top-right-radius: 50px;
    -moz-border-radius-topleft: 50px;
    border-top-left-radius: 50px;
    -moz-border-radius-bottomright: 50px;
    border-bottom-right-radius: 50px;
    -moz-border-radius-bottomleft: 50px;
    border-bottom-left-radius: 50px;
    border: 1px solid Black;
}

This CSS class applied to the pop up container. The important CSS are width and height for the pop up. The rest can be ignored if you don’t want the cosmetic effects.

I also created few Javascript functions for this page to handle the show and hide of the pop up panel. They are pretty straight forward by using jQuery.

        <script type="text/javascript">
            $(document).ready(function () {
                //Hide all pop up related elements during page ready.
                ClosePopUp();
            });

            function ShowModalPopUp_SemiTransparentBG() {
                $("#SemiTransparentBG").show('slow');
                $("#PopUp").show('slow');
                $("#PopUpBody")[0].innerHTML = "This popup brings a visual effect that tell user, they are not allow to click the background controls until this popup being closed.";
            };

            function ShowModalPopUp_TransparentBG() {
                $("#TransparentBG").show('slow');
                $("#PopUp").show('slow');
                $("#PopUpBody")[0].innerHTML = "This popup <b>doesn't</b> brings a visual effect that tell user, they are not allow to click the background controls until this popup closed. </br> </br> <b>In fact</b>, they cannot click the background controls. ^^";
            };

            function ShowPopUp_NoBG() {
                $("#PopUp").show('slow');
                $("#PopUpBody")[0].innerHTML = "This popup will not block access to any visible background controls.";
            };

            function ClosePopUp() {
                $("#SemiTransparentBG").hide('slow');
                $("#TransparentBG").hide('slow');
                $("#PopUp").hide('slow');
            };
        </script>

If you don’t like to code in Javascript, I has prepared another page for you as reference. There are nothing different by comparing the CSS classes. The only different is it isn’t using any Javascript but C# (VB.NET also can).

        protected void Page_Load(object sender, EventArgs e)
        {
            if (!Page.IsPostBack)
                HidePopUp();
        }

        private void HidePopUp()
        {
            SemiTransparentBG.Visible = false;
            TransparentBG.Visible = false;
            PopUp.Visible = false;
        }

        protected void Close_Click(object sender, EventArgs e)
        {
            HidePopUp();
        }

        protected void PopUp_NoBG_Click(object sender, EventArgs e)
        {
            PopUp.Visible = true;
            PopUpBody.InnerText = "This popup will not block access to any visible background controls.";
        }

        protected void ModalPopUp_TransparentBG_Click(object sender, EventArgs e)
        {
            TransparentBG.Visible = true;
            PopUp.Visible = true;
            PopUpBody.InnerHtml = "This popup <b>doesn't</b> brings a visual effect that tell user, they are not allow to click the background controls until this popup closed. </br> </br> <b>In fact</b>, they cannot click the background controls. ^^";
        }

        protected void ModalPopUp_SemiTransparentBG_Click(object sender, EventArgs e)
        {
            SemiTransparentBG.Visible = true;
            PopUp.Visible = true;
            PopUpBody.InnerText = "This popup brings a visual effect that tell user, they are not allow to click the background controls until this popup being closed.";
        }

Download Attachment

This and That, and Javascript

WP_000276

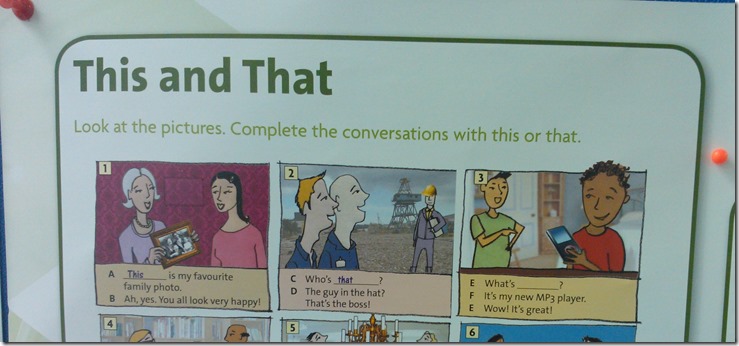
Recently, I saw this in a class room and it remind me on how I use it at Javascript.

To overcome some of the requirements, we have to create client side scripting in an object oriented way. For an example, client side scripting for a custom server control. Anyways, I’m not going to show on how to create a custom server control now. Perhaps, at the other day. Smile

I has created a demo page for this topic. I design a Javascript class for this page with 3 public functions(Container, Push and Pop) and 1 public property(SequenceId).

function Demo() {
    var that = this;
    this.SequenceId = 1;

    Demo.prototype.Container = function () {
        return $(".Container");
    };

    Demo.prototype.Push = function () {
        this.Container().append("<div class='Item'>" + this.SequenceId + "</>");
        this.SequenceId += 1;
    };

    Demo.prototype.Pop = function () {
        if (this.Container().children().length > 0) {
            this.Container().children().first().remove();
        }
    };

    function AddHandler() {
        $("#Add").click(function (s, e) {
            that.Push();
        });

        $("#Remove").click(function (s, e) {
            that.Pop();
        });
    }

    AddHandler();
}

You can see I created a variable that and assigned it with this object. (At Javascript, this represent the current instant of the object.) This is because I’m going to re-use the functions of current instant at function body.

Let me explain this Javascript class.

  • function AddHandler()  : I use this private method to register all event handler of controls so that I can have no Javascript at my page. At this function body, I’m going to use Push and Pop functions which were created as public function. I cannot use this.Push or this.Pop because they will actually point to nothing since the this object is actually represent the button control.ThisnThat
  • this.SequenceId : This is a property of this class object. I use it to store the current running number. It will print on every item.
  • Demo.prototype.Push : This is a public function so the this object in this function body is actually represent the instant of the class.ThisnThat2

To know more about this, you can refer to Douglas Crockford’s Private Members in JavaScript.

Download Attachment

Multiple Validation Groups

Sometimes, it is a requirement to has separate validation groups to be trigged for an action. To meet the requirement, you can simply write some javascripts to perform validation according to the specific condition.

Example:

        function IsSearchInputValidated() {
            return (ClientValidate("Search") & ClientValidate("AdvancedSearch"));
        }

or

        function IsSearchInputValidated() {
            return (ClientValidate("Search") && ClientValidate("AdvancedSearch"));
        }

If you were to write the code in these way, you will get only 1 of the validation groups message displayed. ^^

To overcome this, we can create a helper function to make sure all validation groups being validated at one shot.

        function ClientValidate(groupName) {
            var result = new Boolean(1);
            var g = groupName.split(";");
            var html = new String();

            for (var i = 0; i < g.length; i++) {
                if (!Page_ClientValidate(g[i])) {//not valid.
                    result = false;
                    if (typeof (Page_ValidationSummaries) != "undefined") {
                        for (var j = 0; j < Page_ValidationSummaries.length; j++) {
                            if (Page_ValidationSummaries[j].validationGroup == g[i]) {
                                //Use 'html' variable to keep the previous validation summaries and display together 
                                //with the current validation summaries.
                                html += Page_ValidationSummaries[j].innerHTML;
                                break;
                            }
                        }
                    }
                }
            }

            if (result == false) {
                //Clear others summary and display the validation summarries.
                if (typeof (Page_ValidationSummaries) != "undefined") {
                    for (var i = 0; i < Page_ValidationSummaries.length; i++) {
                        for (var j = 0; j < g.length; j++) {
                            if (Page_ValidationSummaries[i].validationGroup == g[j]) {
                                Page_ValidationSummaries[i].innerHTML = html;
                                Page_ValidationSummaries[i].style.display = "inline"; //"none"; "inline";
                            }
                            else {
                                Page_ValidationSummaries[i].innerHTML = "";
                            }
                        }
                    }
                }
            }

            return result;
        };

And the code to consume it will look like this:

        function IsSearchInputValidated() {

            var option = document.getElementById("AdvancedSearch");

            if (option.checked == true) {
                return ClientValidate("Search;AdvancedSearch");
            }
            else {
                return ClientValidate("Search");
            }
        }

See, now we will have both validation groups message displayed.

image

Download Attachment

Bitwise–some thing you learned during college time.

Convert 10112 to base 10.

1 x 20 = 1
1 x 21 = 2
0 x 22 = 0
1 x 23 = 8

1 + 2 + 0 + 8 = 11

Answer:  10112 = 1110

Is this look familiar? I learned this during my college but I don’t understand how can we use it. Until…I code.

        static void Main(string[] args)
        {
            Console.WriteLine((7 | 3).ToString());
            Console.WriteLine((7 & 3).ToString());
            Console.Read();
        }

Try to run this code at Visual Studio, and you will have this.

image

Let’s start the math resolution now.

7 = 1112 or [22 + 21 + 20 = 7] or [4 + 2 + 1 =7]

3 = 112 or [21 + 20 = 3] or [2 + 1 = 3]

image

image

Remembered? logical operator. 1 AND 1 = 1, 1 AND 0 = 0, 1 OR 1 = 1, 1 OR 0 =1…etc.

Let’s start the code now.

image

Let’s say, we have a survey requirement. See how we can store multiple selection in a field by using bitwise.

public enum Favorites
{
    WCF = 1,
    WPF = 2,
    Web = 4,
    Silverlight = 8,
    None = 0
}

First, we create an Enum class with predefine value for each selection.

    <asp:UpdatePanel ID="UpdatePanel1" runat="server">
        <ContentTemplate>
            <p>
                Please choose your favorite topic[s].
            </p>
            <asp:CheckBox ID="WCF" runat="server" Text="WCF" />
            <br />
            <asp:CheckBox ID="WPF" runat="server" Text="WPF" />
            <br />
            <asp:CheckBox ID="Web" runat="server" Text="Web" />
            <br />
            <asp:CheckBox ID="Silverlight" runat="server" Text="Silverlight" />
            <p>
                <asp:Label ID="Label2" runat="server" Text="Value" AssociatedControlID="DecimalValueText_Get"></asp:Label>
                <asp:TextBox ID="DecimalValueText_Get" runat="server"></asp:TextBox>
                <asp:Button ID="GetValue" runat="server"
                    Text="Get Value" OnClick="GetValue_Click" />
            </p>
            <p>
                <asp:Label ID="Label1" runat="server" Text="Value" AssociatedControlID="DecimalValueText_Set"></asp:Label>
                <asp:TextBox ID="DecimalValueText_Set" runat="server" Text="0"></asp:TextBox>
                <asp:Button ID="SetValue" runat="server"
                    Text="Set Value" OnClick="SetValue_Click" />
            </p>
        </ContentTemplate>
    </asp:UpdatePanel>

        private Int32 Retrieve()
        {
            Int32 result = 0;

            result = WCF.Checked ? (result | Favorites.WCF.GetHashCode()) : result;
            result = WPF.Checked ? (result | Favorites.WPF.GetHashCode()) : result;
            result = Web.Checked ? (result | Favorites.Web.GetHashCode()) : result;
            result = Silverlight.Checked ? (result | Favorites.Silverlight.GetHashCode()) : result;

            return result;
        }

Then, follow by a function to construct a integer value according to the selection.

        private void Display()
        {
            Int32 favorites = int.Parse(DecimalValueText_Set.Text);

            WCF.Checked = ((favorites & Favorites.WCF.GetHashCode()) == Favorites.WCF.GetHashCode());
            WPF.Checked = ((favorites & Favorites.WPF.GetHashCode()) == Favorites.WPF.GetHashCode());
            Web.Checked = ((favorites & Favorites.Web.GetHashCode()) == Favorites.Web.GetHashCode());
            Silverlight.Checked = ((favorites & Favorites.Silverlight.GetHashCode()) == Favorites.Silverlight.GetHashCode());
        }

To make the solution more complete, we create another function to make the selection according to a defined value.

image

Run the project, now you can select multiple items and click “GetValue” to get the result.

image

Or, key in a result and let the program to make the selection by click on “SetValue” button.

Download Attachment